Dripping Chocolate Cake Recipes – Why This Recipe?
As Chef Greeny, I’ve spent years perfecting desserts that make people’s eyes widen with delight. Of all the sweet creations I’ve developed, dripping chocolate cake recipes hold a special place in my heart. My love affair with these decadent treats began in my grandmother’s kitchen, where I first watched chocolate cascade down the sides of a perfectly frosted cake, creating what looked like edible art.
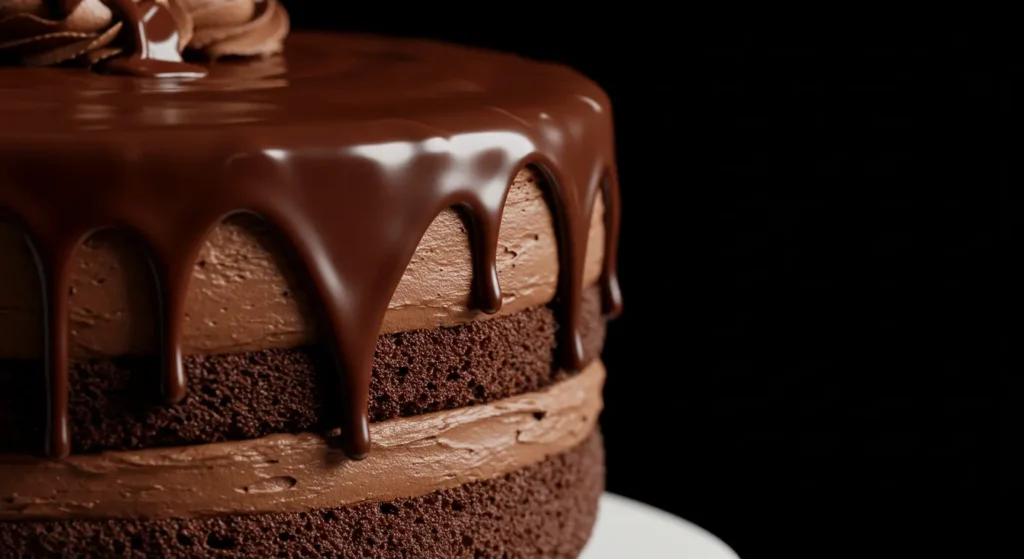
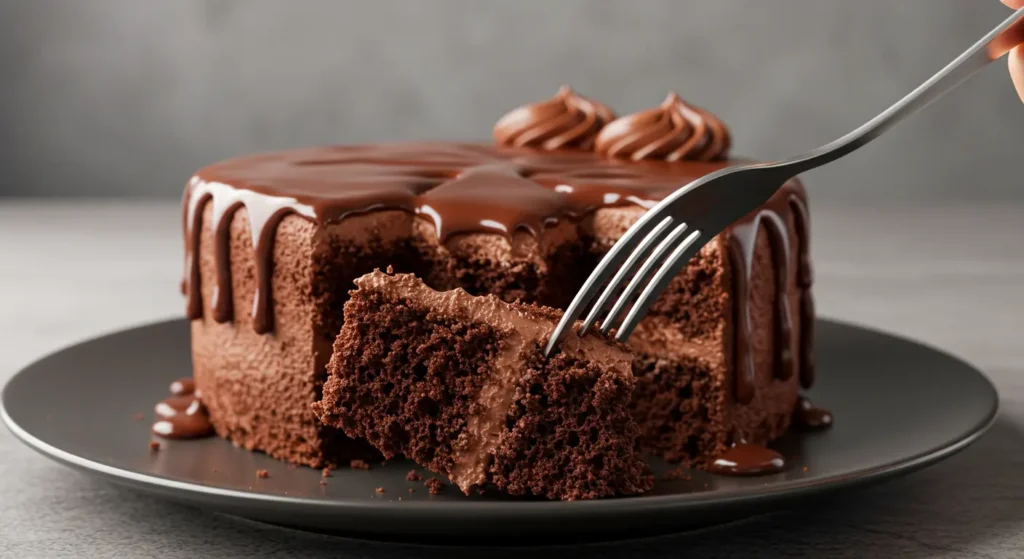
Dripping chocolate cake recipes aren’t just desserts; they’re showstoppers. What makes these recipes truly special is how they transform ordinary cakes into extraordinary experiences. The mesmerizing effect of chocolate dripping down the sides creates a visual feast even before the first bite.
In this comprehensive guide, I’ll share my signature dripping chocolate cake recipes with unique twists that set them apart from standard chocolate cakes. Some incorporate surprising flavor combinations like chili and sea salt, while others feature innovative techniques for achieving the perfect chocolate drip consistency.
By the end of this post, you’ll master the art of creating stunning dripping chocolate cakes that taste as magnificent as they look. From ingredient selection to troubleshooting common issues, I’ve covered everything you need to create these impressive desserts for any special occasion.
Dripping Chocolate Cake Recipes – Ingredients and Preparation
Ingredients List
For the Classic Dripping Chocolate Cake (serves 12):
For the Cake:
1 cup hot coffee or boiling water
2 cups all-purpose flour
2 cups granulated sugar
¾ cup unsweetened cocoa powder
2 teaspoons baking soda
1 teaspoon baking powder
1 teaspoon salt
2 large eggs, room temperature
1 cup buttermilk
½ cup vegetable oil
2 teaspoons pure vanilla extract
- 1 cup hot coffee or boiling water
For the Chocolate Ganache Frosting:
- 8 ounces semi-sweet chocolate, chopped
- 1 cup heavy cream
- 2 tablespoons unsalted butter
- 1 teaspoon vanilla extract
For the Chocolate Drip:
- 6 ounces dark chocolate, finely chopped
- ¾ cup heavy cream
- 1 tablespoon corn syrup (optional, for shine)
Substitutions for Dietary Needs:
- Gluten-Free: Replace all-purpose flour with a gluten-free 1:1 baking flour
- Vegan: Substitute eggs with flax eggs (2 tablespoons ground flaxseed mixed with 6 tablespoons water); use plant-based milk with 1 tablespoon vinegar instead of buttermilk; replace heavy cream with full-fat coconut cream; use vegan chocolate and butter
- Dairy-Free: Use almond or oat milk with 1 tablespoon vinegar instead of buttermilk; coconut oil instead of butter; dairy-free chocolate
Step-by-Step Instructions
Chocolate Cake Base:
- Prepare your pans: Preheat oven to 350°F (175°C). Grease and line two 9-inch round cake pans with parchment paper.
- Mix dry ingredients: In a large bowl, whisk together flour, sugar, cocoa powder, baking soda, baking powder, and salt until well combined. Tip: Sift the cocoa powder to avoid lumps in your batter.
- Combine wet ingredients: In a separate bowl, beat eggs, buttermilk, oil, and vanilla extract until smooth. Tip: Room temperature ingredients blend more easily and produce a more uniform batter.
- Create the batter: Gradually add the wet ingredients to the dry ingredients, mixing on medium speed until just combined. Don’t overmix! Tip: Scrape down the sides of the bowl to ensure all ingredients are incorporated.
- Add hot coffee: Slowly pour in the hot coffee (or boiling water) and mix on low speed until combined. The batter will be quite thin—this is normal and creates an incredibly moist cake. Tip: The coffee enhances the chocolate flavor without making the cake taste like coffee.
- Bake: Divide batter evenly between prepared pans and bake for 30-35 minutes, or until a toothpick inserted in the center comes out clean with a few moist crumbs. Tip: Don’t open the oven during the first 25 minutes of baking to prevent the cake from sinking.
- Cool: Let cakes cool in pans for 10 minutes, then turn out onto wire racks to cool completely before frosting. Tip: For easier frosting, wrap the cooled cake layers in plastic wrap and refrigerate for 1-2 hours or overnight.
For the Chocolate Ganache Frosting:
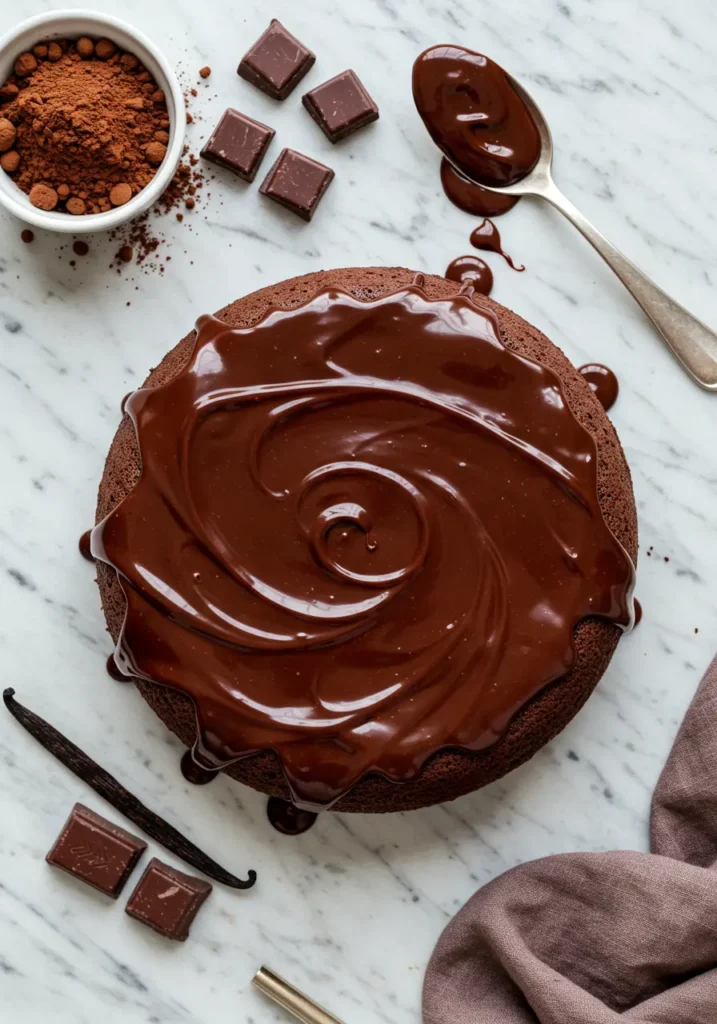
- Make ganache: Place chopped chocolate in a heatproof bowl. Heat heavy cream in a saucepan until just simmering, then pour over chocolate. Tip: Let sit for 2-3 minutes before stirring to allow the chocolate to begin melting.
- Finish ganache: Add butter and vanilla, then stir until completely smooth and glossy. Tip: If any tiny chocolate pieces remain, strain the mixture through a fine mesh sieve.
- Cool and whip: Allow ganache to cool to room temperature, then refrigerate for 30-45 minutes until thickened but still spreadable. Whip with an electric mixer for 2-3 minutes until light and fluffy. Tip: Don’t let the ganache get too cold, or it will become too stiff to spread.
Assembly and Chocolate Drip:
- Level and assemble: Trim cake tops if domed. Place one layer on a cake board or serving plate and spread with about 1 cup of ganache frosting. Top with the second layer. Tip: Place strips of parchment paper under the edges of the cake to keep your serving plate clean while decorating.
- Crumb coat: Apply a thin layer of frosting all over the cake and chill for 20 minutes to set. Tip: This seals in crumbs for a smoother final layer.
- Final frosting: Apply remaining frosting evenly to the top and sides of the cake. Smooth with an offset spatula or bench scraper. Chill for at least 30 minutes. Tip: For perfectly smooth sides, warm your metal bench scraper in hot water, dry it, and then run it along the sides of the cake.
- Prepare chocolate drip: Place chopped dark chocolate in a bowl. Heat heavy cream until just simmering, then pour over chocolate. Add corn syrup if using. Let sit for 3 minutes, then stir until smooth. Tip: The drip mixture should be lukewarm (85-90°F) for the perfect consistency—too warm and it will run off the cake, too cool and it won’t drip properly.
- Create the drip effect: Allow the mixture to cool until slightly thickened but still pourable. Starting at the edges of the chilled cake, spoon or pipe small amounts of chocolate, allowing it to drip down the sides. Fill in the top with remaining chocolate. Tip: Test a drip on the back of the cake first to check the consistency and flow.
- Set and serve: Refrigerate the cake for 15-20 minutes to set the drip before serving. Tip: For clean slices, run a knife under hot water, dry it, then cut. Clean and reheat the knife between each slice.
Notes and Tips
Storage Instructions:
- Room Temperature: The completed cake will keep at room temperature in a cake dome or airtight container for up to 2 days.
- Refrigerator: Store for up to 5 days. Bring to room temperature for 1-2 hours before serving for best flavor and texture.
- Freezer: Individual slices or the entire cake (undecorated) can be frozen for up to 3 months. Wrap tightly in plastic wrap and then aluminum foil. Thaw overnight in the refrigerator.
Make-Ahead Options:
- Cake layers can be baked up to 3 days in advance if wrapped well and refrigerated.
- Ganache frosting can be made 1-2 days ahead and stored in the refrigerator. Bring to room temperature and re-whip before using.
- Fully assembled cake (without the drip) can be made 1 day in advance. Add the chocolate drip the day of serving for the freshest look.
Serving Suggestions:
- Pair with fresh berries, whipped cream, or vanilla ice cream for an enhanced experience.
- Serve with hot coffee, milk, or a dessert wine for a complete dessert experience.
- For special occasions, decorate with chocolate curls, gold leaf, or edible flowers to elevate the presentation.
Dripping Chocolate Cake Recipes – Nutritional Information
Nutrition Facts (Per Serving, based on 12 servings)
- Calories: 585
- Carbohydrates: 67g
- Protein: 6g
- Total Fat: 32g
- Saturated Fat: 16g
- Unsaturated Fat: 14g
- Trans Fat: 0g
- Fiber: 3g
- Sugar: 48g
- Cholesterol: 82mg
- Sodium: 365mg
Note: Nutritional values are approximate and will vary based on specific ingredients used and portion sizes. Adjustments for dietary substitutions will alter these values.
Dripping Chocolate Cake Recipes – History and Cultural Significance
The concept of dripping chocolate cake recipes has an intriguing history that reflects our ongoing love affair with chocolate desserts. While the modern drip cake trend exploded on social media around 2015, the technique of allowing chocolate to cascade down cake sides has roots in traditional European pastry.
Chocolate ganache itself dates back to 19th century France, where patissiers created this luscious mixture of chocolate and cream for truffles and tarts. The technique of pouring glossy chocolate over cakes evolved from traditional European entremet cakes and the classic Sachertorte from Vienna, developed in 1832, which featured a mirror-like chocolate glaze.
The contemporary dripping chocolate cake took inspiration from these traditional methods but transformed them into a deliberate aesthetic statement. What began in high-end bakeries quickly spread to home kitchens worldwide, especially after social media platforms showcased these dramatic creations.
Regional variations exist across culinary traditions:
- In Mexico, chocolate drip techniques might incorporate chili-infused chocolate, reflecting their ancient chocolate traditions.
- Belgian interpretations often use their renowned chocolate with higher cocoa butter content for a particularly luxurious drip.
- Japanese dripping chocolate cakes frequently feature matcha or yuzu flavors paired with white chocolate drips for striking color contrasts.
The dripping chocolate cake represents our fascination with desserts that are both visually dramatic and indulgently delicious—a perfect embodiment of contemporary food culture that values presentation as highly as taste.

Dripping Chocolate Cake Recipes – Creative Variations
1. Triple Berry Dripping Chocolate Cake
This vibrant variation incorporates fresh berries for a fruity twist:
Key Modifications:
- Add 1 cup mixed berries (raspberries, blueberries, and blackberries) to the cake batter
- Include a berry compote layer between cake layers (2 cups mixed berries cooked with 1/4 cup sugar and 1 tablespoon lemon juice)
- Use white chocolate for the drip and color it pink with natural food coloring
- Garnish with additional fresh berries and mint leaves
Tips: The acidity in berries may require adding an extra 1/4 teaspoon of baking soda to the cake batter. For a striking visual effect, allow some berry compote to drip slightly down the sides before adding the chocolate drip.
2. Salted Caramel Dripping Chocolate Cake
This sophisticated variation balances sweet and salty flavors:
Key Modifications:
- Add 1/2 teaspoon sea salt to the cake batter
- Replace half the ganache frosting with salted caramel buttercream
- Create a dual drip effect with both chocolate and caramel drips (prepare caramel drip with 1 cup sugar, 1/4 cup water, 1/2 cup heavy cream, and 1 teaspoon sea salt)
- Garnish with chocolate-covered pretzels and a sprinkle of flaky sea salt
Tips: For the caramel drip, ensure it’s slightly thicker than the chocolate to prevent running. Apply the chocolate drips first, chill, then add caramel drips in between for a stunning striped effect.
3. Vegan Chocolate-Orange Dripping Cake
Perfect for plant-based diets without sacrificing flavor or presentation:
Key Modifications:
- Replace eggs with 1/2 cup unsweetened applesauce plus 1 teaspoon baking powder
- Use orange juice instead of coffee in the cake batter and add 2 tablespoons orange zest
- Create vegan ganache with full-fat coconut milk and dairy-free dark chocolate
- Add 1 teaspoon orange extract to the drip chocolate
- Garnish with candied orange peel
Tips: When making vegan chocolate ganache, use a higher ratio of chocolate to coconut milk (2:1) for a stable frosting. The orange flavor pairs beautifully with chocolate while adding brightness to this rich dessert.
Dripping Chocolate Cake Recipes – Frequently Asked Questions
Can I freeze this dripping chocolate cake?
Yes! The cake layers freeze beautifully for up to 3 months when properly wrapped. For best results, freeze the cake layers without frosting or drip. If you want to freeze a completed cake, do so before adding the chocolate drip, as freezing and thawing can affect the glossy finish. When ready to serve, thaw overnight in the refrigerator, then bring to room temperature for 1-2 hours before serving.
What can I substitute for buttermilk in dripping chocolate cake recipes?
You can easily make a buttermilk substitute by adding 1 tablespoon of white vinegar or lemon juice to 1 cup of milk (any kind—dairy or plant-based). Let it sit for 5-10 minutes until slightly curdled, then use as directed. Alternatively, you can use an equal amount of plain yogurt or sour cream thinned with a little milk to reach a buttermilk consistency.
Why did my chocolate drip harden too quickly or run off the cake completely?
Temperature is the critical factor for the perfect drip! If your chocolate hardened too quickly, it was likely too cool (below 80°F) when applied. If it ran down too far, it was too warm (above 95°F). The ideal temperature is 85-90°F for that perfect drip effect. Also, ensure your cake is properly chilled before applying the drip—about 30 minutes in the refrigerator creates the perfect surface for controlled dripping.
How long does it take to prepare a dripping chocolate cake from start to finish?
Total preparation time is approximately 3-4 hours, but this includes several waiting periods:
- Cake baking and cooling: 1.5 hours
- Making frosting: 20 minutes
- Chilling time between layers: 30 minutes
- Final frosting: 20 minutes
- Chilling before drip: 30 minutes
- Drip application: 15 minutes
- Final setting: 15 minutes
For best results, consider spreading the process over two days—bake the cakes and prepare the frosting on day one, then assemble and add the drip on day two.
Can I make dripping chocolate cake recipes without a stand mixer?
Absolutely! While a stand mixer makes the process easier, you can achieve excellent results with a hand mixer or even by hand with a whisk and some elbow grease. For the frosting, a hand mixer is recommended to achieve the proper consistency, but the cake batter can be mixed by hand if necessary.
Dripping Chocolate Cake Recipes – Final Thoughts
Mastering dripping chocolate cake recipes elevates your baking repertoire from everyday to extraordinary. The dramatic effect of glossy chocolate cascading down a perfectly frosted cake creates an unforgettable visual impact that matches the decadent flavor experience.
Through this guide, we’ve explored not only the classic dripping chocolate cake but also exciting variations that can be adapted to different dietary needs and flavor preferences. The techniques you’ve learned—from creating the perfect drip consistency to troubleshooting common issues—will serve you well across many baking projects.
Remember that practice makes perfect with these showstopping desserts. Don’t be discouraged if your first attempt doesn’t look exactly like the pictures—each cake will have its own unique pattern of drips that makes it a one-of-a-kind creation.
I encourage you to experiment with different chocolate types, colors, and complementary flavors to create your signature dripping chocolate cake. The joy of baking lies not just in following recipes but in making them your own through creative adaptations.
I’d love to hear about your experiences with these dripping chocolate cake recipes! Have you tried any of the variations? Did you create your own unique twist? Leave a comment below sharing your results or questions—the baking community thrives on shared knowledge and inspiration.
For more delicious recipes and baking techniques, be sure to subscribe to my newsletter or follow me on social media. Until our next baking adventure, may your cakes be moist, your chocolate glossy, and your drips perfectly cascading!