As Chef Greeny, I’ve spent years perfecting the art of mini desserts that make a big impression. When it comes to entertaining, nothing beats the charm and versatility of perfectly crafted mini dessert cups. These bite-sized indulgences aren’t just trendy—they’re practical, elegant, and absolutely irresistible. Today, I’m sharing my top recipes for the best mini dessert cups that will elevate any gathering from ordinary to extraordinary.
Best Mini Dessert Cups – Why This Recipe?
My journey with mini dessert cups began during my time working at a high-end catering company in Paris. We were tasked with creating elegant desserts for a celebrity wedding, but with a twist—everything had to be single-serve and easy to eat while mingling. That challenge sparked my love affair with miniature desserts.
What makes these mini dessert cups special is their perfect balance of flavors and textures in just a few bites. Unlike full-sized desserts that can sometimes overwhelm, these petite treats allow your guests to sample multiple flavors without feeling stuffed. They’re also incredibly photogenic—expect your social media to light up when you serve these at your next gathering!
In this comprehensive guide, you’ll learn how to create seven stunning mini dessert cups, from classic tiramisu to innovative fruit parfaits. I’ll share professional tips for presentation, make-ahead strategies, and creative variations to suit any dietary preference. Whether you’re a seasoned baker or a dessert novice, these recipes will help you create impressive treats that taste as good as they look.
Best Mini Dessert Cups – Ingredients and Preparation
Ingredients List

Base Ingredients (for all recipes):
- 24 small clear plastic or glass cups (2-3 oz each)
- Piping bags
- Small spoons for layering
- Optional: edible flowers, gold leaf, or mint leaves for garnish
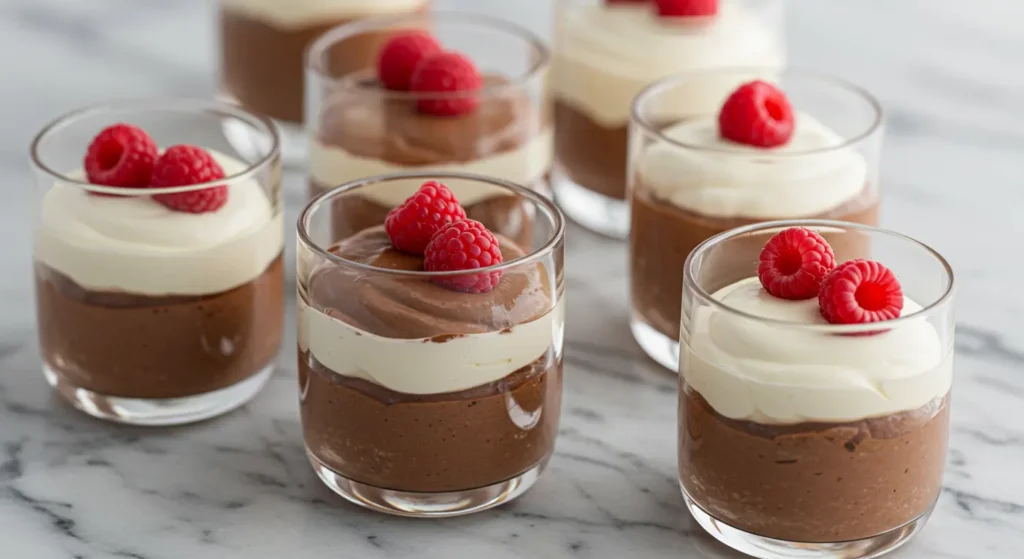
Recipe 1: Mini Chocolate Mousse Cups
Chocolate shavings for garnish
8 oz high-quality dark chocolate (70% cocoa)
2 cups heavy whipping cream, divided
4 large egg yolks
¼ cup granulated sugar
1 tsp vanilla extract
Pinch of salt
Recipe 2: Berry Cheesecake Cups
- 1 cup graham cracker crumbs
- 4 tbsp unsalted butter, melted
- 16 oz cream cheese, softened
- ½ cup granulated sugar
- 1 tsp vanilla extract
- 1 cup fresh mixed berries (strawberries, blueberries, raspberries)
- 2 tbsp berry preserves
- Zest of 1 lemon
Recipe 3: Mini Tiramisu Cups
- 1 cup brewed espresso, cooled
- 2 tbsp coffee liqueur (optional)
- 8 oz mascarpone cheese
- ¾ cup heavy cream
- ⅓ cup granulated sugar
- 1 tsp vanilla extract
- 12 ladyfinger cookies, broken into pieces
- 2 tbsp cocoa powder for dusting
Recipe 4: Lemon Meringue Cups
- 1 cup granulated sugar, divided
- ¼ cup cornstarch
- ¼ tsp salt
- 1½ cups water
- 4 large egg yolks, beaten
- 3 tbsp butter
- ½ cup fresh lemon juice
- 1 tbsp lemon zest
- 4 large egg whites
- ¼ tsp cream of tartar
- ½ cup crushed shortbread cookies
Recipe 5: Salted Caramel Pudding Cups
- 1 cup granulated sugar
- 6 tbsp unsalted butter
- ½ cup heavy cream
- 1 tsp sea salt
- 2 cups whole milk
- 4 large egg yolks
- 3 tbsp cornstarch
- 1 tsp vanilla extract
- ½ cup crushed pretzels
Recipe 6: Tropical Coconut Panna Cotta Cups
- 2 cups coconut milk
- ½ cup granulated sugar
- 1 packet (2¼ tsp) unflavored gelatin
- 3 tbsp cold water
- 1 tsp vanilla extract
- 1 cup diced tropical fruits (mango, pineapple, kiwi)
- 2 tbsp toasted coconut flakes
Recipe 7: Vegan Chocolate Avocado Mousse Cups
- 3 ripe avocados
- ½ cup cocoa powder
- ½ cup maple syrup
- 1 tsp vanilla extract
- ¼ cup almond milk
- Pinch of salt
- ¼ cup crushed hazelnuts
- Fresh berries for garnish
Substitution Options:
- Gluten-free: Use gluten-free cookies or crackers for crusts
- Dairy-free: Substitute coconut cream for heavy cream, plant-based cream cheese for regular
- Vegan: Use maple syrup instead of honey, agar-agar instead of gelatin
- Sugar alternatives: Coconut sugar, monk fruit sweetener, or stevia (adjust quantities as needed)
Step-by-Step Instructions

Recipe 1: Mini Chocolate Mousse Cups
- Prepare the chocolate base: Melt 8 oz of dark chocolate in a heatproof bowl set over simmering water. Once melted, set aside to cool slightly. Tip: Avoid overheating chocolate as it can become grainy. Remove from heat when a few small pieces remain and stir until completely melted.
- Make the custard: In a medium bowl, whisk together egg yolks and sugar until pale and thick. Heat 3/4 cup of heavy cream until just below simmer, then slowly pour into the egg mixture while whisking continuously. Tip: Pour the hot cream very slowly while whisking vigorously to prevent the eggs from scrambling.
- Combine and chill: Pour the custard back into the pan and cook over low heat until slightly thickened (about 3-4 minutes). Remove from heat, stir in the melted chocolate and vanilla extract. Let cool completely.
- Whip the cream: Beat the remaining 1¼ cups of heavy cream until stiff peaks form.
- Fold and assemble: Gently fold the whipped cream into the cooled chocolate mixture. Transfer to a piping bag and pipe into mini dessert cups. Refrigerate for at least 2 hours.
- Garnish: Before serving, top with chocolate shavings or a small raspberry.
Recipe 2: Berry Cheesecake Cups
- Make the crust: Combine graham cracker crumbs with melted butter. Press about 1 tablespoon of mixture into the bottom of each cup. Tip: Use the back of a measuring spoon to firmly press the crumbs into an even layer.
- Prepare the filling: Beat cream cheese until smooth, then add sugar and vanilla extract. Continue beating until light and fluffy.
- Create berry mixture: Toss fresh berries with berry preserves and lemon zest.
- Assemble: Pipe or spoon cheesecake filling over crusts, then top with berry mixture.
- Chill: Refrigerate for at least 3 hours or overnight for best results.
Recipe 3: Mini Tiramisu Cups
- Prepare coffee mixture: Combine cooled espresso with coffee liqueur (if using).
- Make mascarpone cream: Beat mascarpone, heavy cream, sugar, and vanilla until smooth and fluffy.
- Assemble layers: Quickly dip ladyfinger pieces in coffee mixture and place at the bottom of each cup. Top with a layer of mascarpone cream. Repeat layers, ending with cream.
- Finish and chill: Dust the tops with cocoa powder and refrigerate for at least 4 hours. Tip: Don’t soak the ladyfingers too long—just a quick dip or they’ll become soggy.
Recipe 4: Lemon Meringue Cups
- Prepare lemon curd: In a saucepan, combine ¾ cup sugar, cornstarch, and salt. Gradually whisk in water. Cook over medium heat until thickened. Temper egg yolks, then return mixture to pan and cook 2 more minutes. Remove from heat, add butter, lemon juice, and zest.
- Make cookie base: Press crushed shortbread cookies into the bottom of each cup.
- Add lemon layer: Once cooled slightly, pour lemon curd over cookie base. Refrigerate until set (about 2 hours).
- Prepare meringue: Beat egg whites with cream of tartar until foamy. Gradually add remaining ¼ cup sugar and beat until stiff, glossy peaks form.
- Finish: Pipe meringue on top of each cup and lightly toast with a kitchen torch (optional).
Recipe 5: Salted Caramel Pudding Cups
- Make caramel: In a heavy saucepan, melt sugar over medium heat until amber colored. Add butter, then carefully stir in cream and sea salt.
- Prepare pudding base: In another pan, whisk milk, egg yolks, and cornstarch. Cook over medium heat until thickened. Remove from heat and stir in ¾ of the caramel sauce and vanilla.
- Assemble: Sprinkle crushed pretzels at the bottom of each cup. Pour pudding over pretzels and refrigerate until set (about 3 hours).
- Garnish: Before serving, drizzle remaining caramel on top and add a pinch of sea salt.
Recipe 6: Tropical Coconut Panna Cotta Cups
- Bloom gelatin: Sprinkle gelatin over cold water and let sit for 5 minutes.
- Heat coconut milk: In a saucepan, combine coconut milk and sugar. Heat until sugar dissolves (do not boil).
- Combine and pour: Remove from heat, stir in bloomed gelatin and vanilla until dissolved. Let cool slightly.
- Assemble: Pour into cups and refrigerate until set (about 4 hours).
- Garnish: Top with diced tropical fruits and toasted coconut flakes before serving.
Recipe 7: Vegan Chocolate Avocado Mousse Cups
- Make base layer: Press crushed hazelnuts into the bottom of each cup.
- Prepare mousse: In a food processor, blend avocados, cocoa powder, maple syrup, vanilla, almond milk, and salt until completely smooth.
- Assemble: Pipe or spoon mousse over the hazelnut base. Refrigerate for at least 2 hours.
- Garnish: Top with fresh berries before serving.
Notes and Tips
Storage Tips:
- Most mini dessert cups can be refrigerated for 2-3 days when covered with plastic wrap.
- For best presentation, add fresh garnishes just before serving.
- Chocolate mousse, cheesecake, and panna cotta cups freeze well for up to 1 month.
Make-Ahead Instructions:
- Prepare all components 1-2 days ahead and assemble the morning of your event.
- Store assembled desserts in the refrigerator, covered loosely with plastic wrap.
- For desserts with crisp elements (like meringue), assemble these components just before serving.
Serving Suggestions:
- Arrange cups on a multi-tiered stand for an impressive dessert table display.
- Provide small dessert spoons with each cup.
- Serve mini dessert cups on a tray with fresh flowers between them for an elegant presentation.
- For a dessert bar, include small cards identifying each flavor.
Best Mini Dessert Cups – Nutritional Information
Nutrition Facts (Per Serving)
Mini Chocolate Mousse Cup:
- Calories: 220
- Carbohydrates: 15g
- Protein: 3g
- Total Fat: 18g
- Saturated Fat: 11g
- Unsaturated Fat: 6g
- Trans Fat: 0g
- Fiber: 2g
- Sugar: 12g
- Cholesterol: 105mg
- Sodium: 40mg
Berry Cheesecake Cup:
- Calories: 185
- Carbohydrates: 16g
- Protein: 3g
- Total Fat: 12g
- Saturated Fat: 7g
- Unsaturated Fat: 4g
- Trans Fat: 0g
- Fiber: 1g
- Sugar: 11g
- Cholesterol: 35mg
- Sodium: 120mg
Mini Tiramisu Cup:
- Calories: 170
- Carbohydrates: 14g
- Protein: 2g
- Total Fat: 11g
- Saturated Fat: 6g
- Unsaturated Fat: 4g
- Trans Fat: 0g
- Fiber: 0g
- Sugar: 9g
- Cholesterol: 65mg
- Sodium: 30mg
Lemon Meringue Cup:
- Calories: 155
- Carbohydrates: 28g
- Protein: 3g
- Total Fat: 5g
- Saturated Fat: 3g
- Unsaturated Fat: 2g
- Trans Fat: 0g
- Fiber: 0g
- Sugar: 23g
- Cholesterol: 75mg
- Sodium: 85mg
Salted Caramel Pudding Cup:
- Calories: 190
- Carbohydrates: 24g
- Protein: 3g
- Total Fat: 10g
- Saturated Fat: 6g
- Unsaturated Fat: 3g
- Trans Fat: 0g
- Fiber: 0g
- Sugar: 20g
- Cholesterol: 90mg
- Sodium: 220mg
Tropical Coconut Panna Cotta Cup:
- Calories: 165
- Carbohydrates: 18g
- Protein: 2g
- Total Fat: 10g
- Saturated Fat: 9g
- Unsaturated Fat: 1g
- Trans Fat: 0g
- Fiber: 1g
- Sugar: 15g
- Cholesterol: 0mg
- Sodium: 15mg
Vegan Chocolate Avocado Mousse Cup:
- Calories: 180
- Carbohydrates: 17g
- Protein: 3g
- Total Fat: 14g
- Saturated Fat: 3g
- Unsaturated Fat: 10g
- Trans Fat: 0g
- Fiber: 5g
- Sugar: 10g
- Cholesterol: 0mg
- Sodium: 35mg
Best Mini Dessert Cups – History and Cultural Significance
The concept of mini dessert cups has a fascinating evolution that spans cultures and centuries. The tradition of serving bite-sized desserts dates back to ancient Roman and Greek banquets, where sweet treats were presented in small vessels to signal the end of a meal. However, the modern interpretation of dessert cups as we know them today gained popularity in the early 2000s with the rise of food presentation as an art form.
In French cuisine, they’re reminiscent of “verrines” – layered appetizers or desserts served in small glasses that became trendy in high-end Parisian restaurants in the 1990s. Chef Pierre Hermé, often called the “Picasso of Pastry,” is credited with popularizing these layered mini desserts that showcase contrasting flavors, colors, and textures.
In Italian cuisine, the concept mirrors “bicchierini” – small glass cups filled with tiramisu, panna cotta, or fruit-based desserts. These are particularly popular during holidays and celebrations when families gather for long, multi-course meals.
Asian cultures have their own versions as well. In Japan, “wagashi” are often served in small portions with tea ceremonies, while in Thailand, coconut-based desserts are traditionally presented in miniature porcelain cups or natural containers like coconut shells.
The American interpretation of mini dessert cups emerged strongly during the 2008 recession when restaurants sought ways to offer affordable luxury. Rather than selling expensive full-sized desserts, chefs created miniature versions that allowed customers to indulge without breaking the bank. This trend coincided with the rise of food blogs and Instagram, where these photogenic treats became social media stars.
Today, the best mini dessert cups represent a global fusion of techniques and flavors, celebrating both tradition and innovation in equal measure.
Best Mini Dessert Cups – Creative Variations
Seasonal Mini Dessert Cups
Transform your mini dessert cups throughout the year with these seasonal variations:
Summer Fresh: Berry Lemonade Cups
- Replace the berry cheesecake filling with a lighter lemon mousse
- Layer with macerated seasonal berries
- Add a sprinkle of crushed freeze-dried raspberries for color and crunch
- Garnish with a tiny sprig of fresh mint
Fall Harvest: Pumpkin Spice Cups
- Transform the basic cheesecake mixture by adding 1/2 cup pumpkin puree and 1 tsp pumpkin spice
- Use ginger snap cookies instead of graham crackers for the base
- Top with cinnamon whipped cream and a sprinkle of toasted pecans
- Add a tiny drizzle of maple syrup before serving
Dietary-Specific Mini Dessert Cups
Keto-Friendly Cups
- Base: Mix 1/2 cup almond flour with 2 tbsp melted coconut oil and 1 tbsp powdered erythritol
- Filling: Whip 8 oz cream cheese with 1/4 cup powdered erythritol, 1 tsp vanilla, and 2 tbsp heavy cream
- Topping: Sugar-free berry compote made with mixed berries and powdered erythritol
- Each cup contains approximately 4g net carbs
Gluten-Free & Dairy-Free Chocolate Dream Cups
- Base: Crushed gluten-free chocolate cookies mixed with coconut oil
- Filling: Avocado chocolate mousse (as in Recipe 7) but with coconut sugar instead of maple syrup
- Middle layer: Pureed raspberries mixed with chia seeds
- Topping: Coconut whipped cream and shaved dark chocolate
- Perfect for those with multiple food sensitivities without sacrificing flavor

Best Mini Dessert Cups – Frequently Asked Questions
Can I make mini dessert cups ahead of time? Yes! Most mini dessert cups can be prepared 1-2 days in advance. The key is proper storage—keep them refrigerated and covered with plastic wrap. Add fresh garnishes, whipped cream, or delicate elements just before serving. For longer storage, many varieties (especially mousses and cheesecakes) can be frozen for up to a month.
What are the best containers to use for mini dessert cups? The best containers depend on your occasion and preference. Clear plastic or glass cups (2-3 oz) show off beautiful layers and are perfect for casual gatherings. For more elegant events, consider small shot glasses, demitasse cups, or miniature dessert glasses. Edible cups made from chocolate or cookie dough are impressive options that eliminate waste.
How do I transport mini dessert cups to an event? Place assembled cups in a shallow box or dedicated cupcake carrier with dividers. For added stability, place the cups in a muffin tin lined with non-slip liner. Transport garnishes separately in small containers and add them at the destination. Keep everything refrigerated until about 15-30 minutes before serving.
What’s the secret to perfectly layered mini dessert cups? Use piping bags with various tip sizes for neat layers. Chill each layer before adding the next for clean lines. For liquid components that need to set (like panna cotta), refrigerate at a slight angle for an artistic diagonal appearance. Use the back of a small spoon to guide fillings along the sides of the cup to prevent smudging.
How can I make my mini dessert cups more impressive? Focus on contrasting colors and textures. Add unexpected elements like a thin layer of fruit gel, a sprinkle of flavored salt, or edible gold leaf. Consider temperature contrasts—pair something cold with a warm component added just before serving. Finally, invest in quality ingredients, especially for flavors that star in your dessert.
Best Mini Dessert Cups – Final Thoughts
The beauty of mini dessert cups lies in their perfect balance of elegance and approachability. These bite-sized treats offer a world of creative possibilities while keeping portion sizes reasonable—allowing your guests to sample multiple flavors without the commitment of a full-sized dessert.
What I love most about these best mini dessert cups is their versatility. Whether you’re hosting an elaborate dinner party, a casual backyard gathering, or simply treating yourself to something special on a Tuesday night, these recipes can be adapted to suit any occasion. The ability to prepare most components ahead of time also makes them ideal for entertaining, allowing you to focus on your guests rather than last-minute dessert assembly.
Remember that presentation is key with mini desserts. Invest in simple, clear cups that showcase your beautiful layers, and don’t be afraid to experiment with garnishes and decorative elements. A tiny sprig of mint, a perfectly placed raspberry, or a delicate chocolate curl can elevate your creation from delicious to spectacular.
I encourage you to start with the recipes provided here but don’t be afraid to experiment with your own flavor combinations and creative twists. The world of mini dessert cups is limited only by your imagination—so get creative and share your results!
Have you tried making mini dessert cups before? Which flavor combination are you most excited to try? Leave a comment with your favorite variation or any questions you might have!