As the crisp autumn air settles in and the spooky season approaches, our thoughts turn to festive decorations, creative costumes, and, of course, fun Halloween treats that capture the spirit of the holiday. If you’re searching for a dessert that is visually stunning, delightfully simple, and a guaranteed crowd-pleaser, you’ve come to the right place. Create these adorable Candy Corn Jello Cups for your Halloween party! This easy, no-bake dessert is a colorful and fun layered treat that both kids and adults will love. Perfect for a spooktacular celebration! Mastering these candy corn jello cups is easier than you think, and they bring a vibrant, iconic touch to any dessert table without requiring any baking skills whatsoever.
Why You’ll Love This Recipe
This recipe stands out for its perfect blend of simplicity and spectacular presentation. Unlike many intricate Halloween desserts that demand hours of labor, this halloween jello dessert is remarkably straightforward. The process of creating the distinct layers is almost meditative and incredibly satisfying. You will love the “wow” factor these cups deliver; their bright, cheerful colors instantly elevate the mood of any gathering.
Furthermore, this is a fantastic recipe to make with children. They will be mesmerized watching the separate colors come together to form the classic candy corn shape. It’s a safe, fun, and engaging kitchen activity that results in a delicious reward. Since it’s a easy no-bake treat, you save valuable oven space for other party foods, making your Halloween meal planning significantly less stressful.
Gathering Your Ingredients
The beauty of this recipe lies in its short and simple ingredient list. You likely have some of these items in your pantry already. The key is using clear, transparent cups to showcase the beautiful layers you’ll be creating.
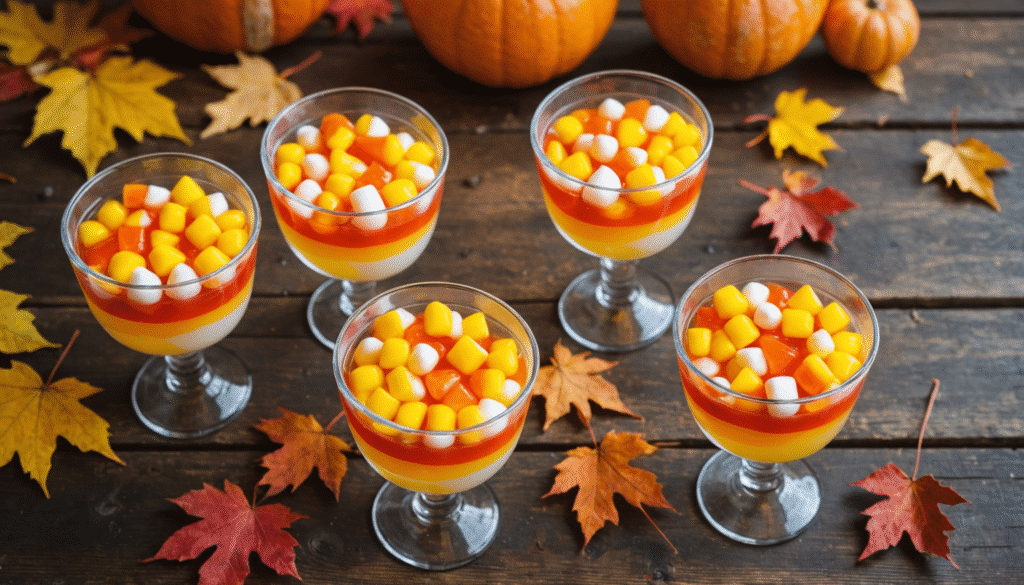
- Jello: You will need three boxes of flavored gelatin. For the authentic candy corn look, use one box of orange flavor, one box of pineapple or lemon (for the yellow layer), and one box of white or unflavored gelatin for the top white layer.
- Boiling Water: Essential for dissolving the gelatin powder completely.
- Cold Water & Milk: The cold water is used to cool the gelatin mixtures. For an extra creamy and opaque white layer, using milk instead of water with the white gelatin is the secret trick.
- Clear Cups: Small, clear plastic or glass dessert cups are ideal. They allow the vibrant layers to be fully visible from all angles.
- Whipped Cream: For an optional but highly recommended garnish on top just before serving.
How to Make the Layers
Creating the perfect layered jello cups requires a little patience, as each layer must set before you add the next. Don’t rush the process, and you will be rewarded with sharp, clean lines.
Step 1: Prepare the Yellow Layer
Begin by dissolving one box of yellow Jello (like pineapple or lemon) in one cup of boiling water. Stir for at least two minutes until the powder is completely dissolved. Then, stir in one cup of cold water. Carefully divide this mixture evenly among your clear cups. Place the cups in the refrigerator and let them chill for about 45-60 minutes, or until the Jello is set enough that it doesn’t jiggle when you gently shake the cup.
Step 2: Create the Orange Layer
Once the yellow layer is set, repeat the process with the orange Jello. Dissolve it in one cup of boiling water, stir in one cup of cold water, and then let this mixture cool to room temperature for about 10-15 minutes. This cooling step is crucial; if the mixture is too hot, it can melt the set yellow layer beneath it. Once cooled, slowly and gently pour the orange liquid over the back of a spoon onto the set yellow Jello. This technique helps prevent the liquid from breaking through the first layer. Return the cups to the fridge to set for another 45-60 minutes.
Step 3: Top with the White Layer
For the final layer, prepare the white gelatin. Dissolve it in one cup of boiling water. Instead of cold water, stir in one cup of cold milk. This is what gives the top layer its creamy, opaque, and authentic candy corn appearance. Let this mixture cool to room temperature as well. Once the orange layer is fully set, gently pour the white milk mixture over it. Chill the completed cups for at least 3-4 hours, or preferably overnight, until completely firm.
Tips for Perfect Results
Achieving picture-perfect layers is easy if you follow a few simple guidelines. The most important factor is allowing each layer enough time to set properly. If you pour a new layer while the previous one is still liquid, the colors will mix and create a muddy effect. Use the “tilt test”—gently tilt the cup; if the Jello doesn’t slide, it’s ready for the next layer.
Always let your hot gelatin mixtures cool to room temperature before adding them to the set layers. Pouring hot liquid is the most common mistake and will instantly melt the delicate layer below. Using the back-of-a-spoon pouring method acts as a cushion, distributing the liquid gently. For the absolute clearest layers, you can even use a small baster or pipette to add the liquid with maximum control.
| Common Issue | Quick Fix |
|---|---|
| Layers are mixing | Ensure previous layer is fully set and new mixture is room temp. |
| White layer is clear, not opaque | Use milk, not water, for the white gelatin. |
| Jello is too watery | Chill for a longer period, ideally overnight. |
Make-Ahead and Storage Tips
This easy no-bake treat is a dream for party planners because it can be made well in advance. The Jello cups need to set for several hours, so preparing them the day before your Halloween party is highly recommended. This not only ensures they are perfectly firm but also frees up your time on the day of the event for other last-minute preparations.
To store, simply cover the cups with plastic wrap or their lids if they came with any, and keep them refrigerated. They will stay fresh and delicious for 3-4 days. I do not recommend freezing these Jello cups, as freezing and thawing will cause the texture to become watery and grainy. For the best presentation and texture, add the whipped cream garnish just before you are ready to serve.
Fun Serving Suggestions
While these candy corn jello cups are stunning on their own, you can easily amplify the Halloween fun with a few creative serving ideas. Just before serving, top each cup with a generous dollop of whipped cream and a single piece of real candy corn for an instantly recognizable garnish. For a spookier twist, use black or orange sprinkles on the whipped cream.
Arrange the cups on a serving tray lined with fake spider webs or black parchment paper. You can also place them next to other Halloween-themed snacks to create a cohesive and festive dessert spread. For an adult version, consider adding a splash of flavored vodka to the Jello mixtures (replacing an equal amount of cold water) for a boozy Halloween cocktail dessert.
Frequently Asked Questions
Can I use a different size or type of cup? Absolutely! You can use larger clear glasses for a bigger dessert or even a single large trifle dish to create one show-stopping centerpiece. Just remember that the setting times may be longer for a larger volume of Jello.
Is there a way to make this recipe sugar-free? Yes, you can easily substitute regular Jello with the sugar-free variety. The process and measurements remain exactly the same, making it a great option for those monitoring their sugar intake.
My top layer sunk into the orange layer a little. What happened? This usually occurs if the orange layer was not 100% set before you added the white layer. The liquid weight of the new layer can cause the semi-set layer beneath to depress slightly. Ensuring each layer is fully firm before proceeding will prevent this.
Can I use all water instead of milk for the white layer? You can, but the top layer will be clear and translucent instead of white and opaque. Using milk is the key to achieving the classic, creamy candy corn look.
These Candy Corn Jello Cups are more than just a dessert; they are a festive activity and a guaranteed conversation starter at any Halloween party. Their vibrant colors and delightful layers capture the playful essence of the season in every spoonful. By following this simple guide, you can create a stunning, professional-looking treat with minimal effort. So, gather your ingredients, embrace the fun of layering, and get ready to impress your guests with this spooktacular and delicious halloween jello dessert. Happy Halloween!